Get Started in 4 Simple Steps
We'll walk you through everything. Most users complete setup in under 10 minutes.
Which broker do you use?
Aconsus works with two trusted brokers. Choose the one that fits you best:
Alpaca Markets
US Stocks- Commission-free US stock trading
- Free paper trading to practice
- Great for beginners
Click to see setup instructions →
Capital.com
CFD Trading- CFDs on stocks, forex, commodities
- Demo account available
- Available in Europe & worldwide
Click to see setup instructions →
Create Your Alpaca Account
Alpaca is a trusted US broker that connects with Aconsus. Creating an account is completely free and only takes a few minutes.
Step 1.1: Go to alpaca.markets
Step 1.2: To create your account, you can use either option:
- Click "Sign Up" in the top right corner, then select "Trading API"
- Or click the yellow "Sign up for Free" button in the center of the page
Both options will take you to the same account creation page.
Screenshot: How to sign up for Alpaca
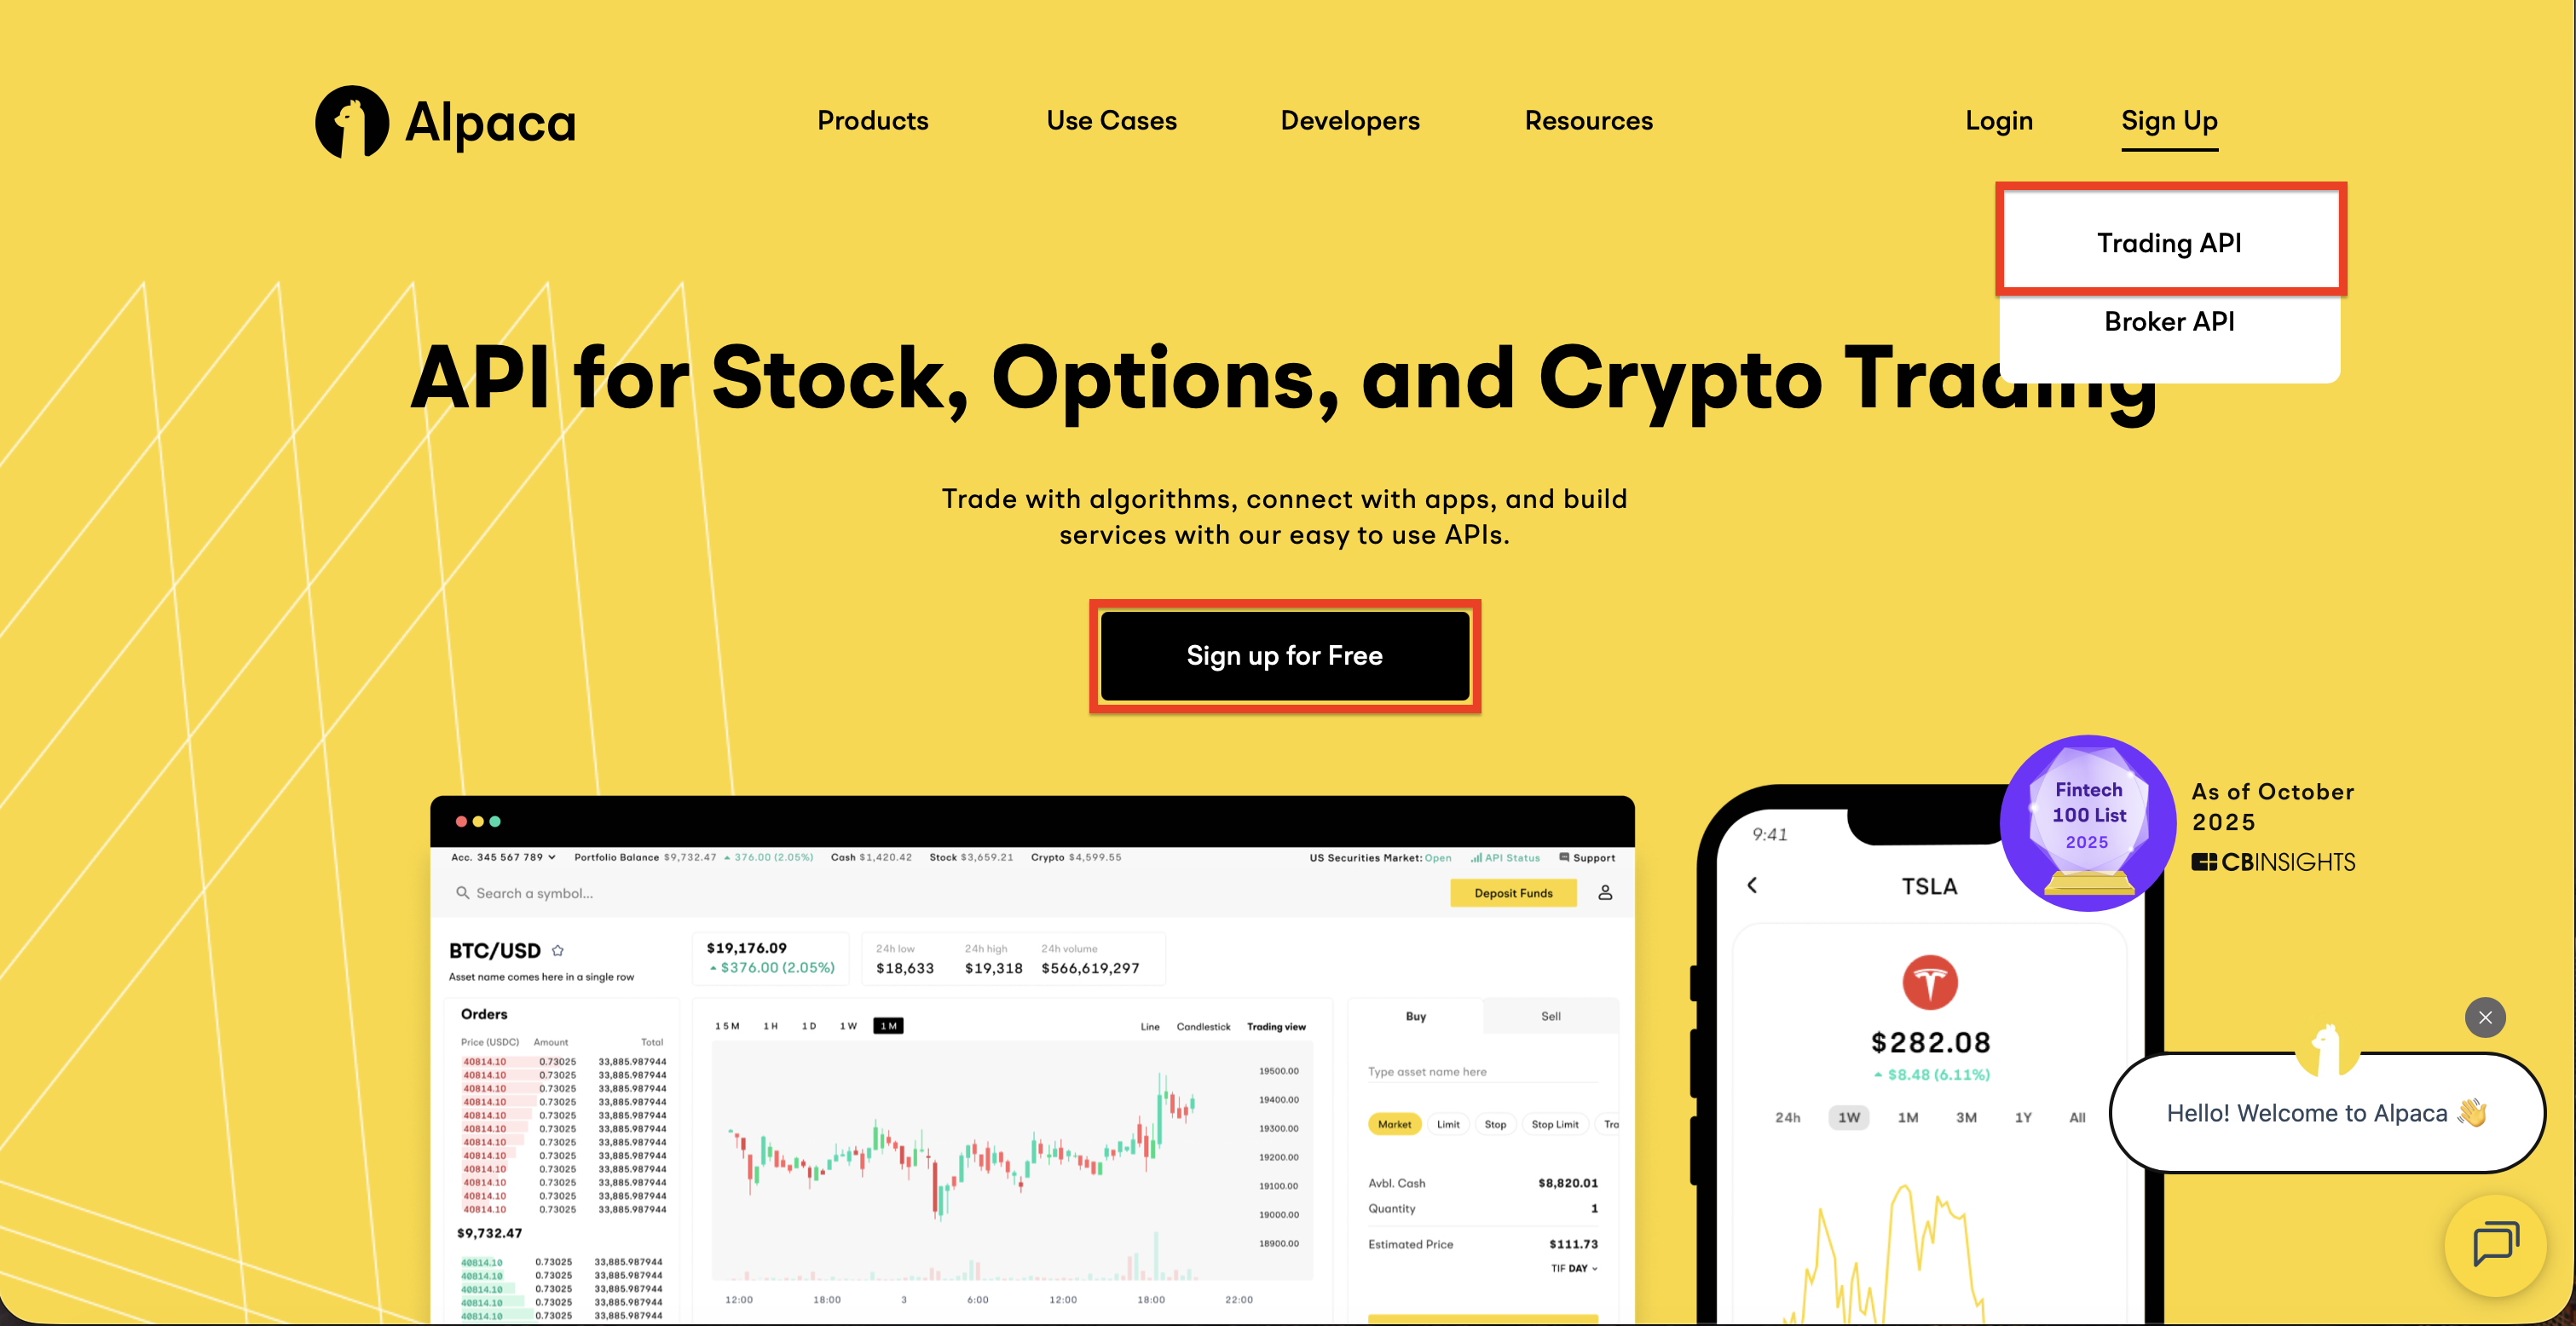
Look for the "Sign Up" button and select "Trading API", then click "Sign up for Free"
Step 1.3: Fill in all the necessary information to complete your registration
Step 1.4: Choose your account type:
- Paper Trading - Practice with virtual money (free, great for beginners)
- Live Trading - Trade with real money (requires identity verification)
Screenshot: Paper Trading vs Live Account
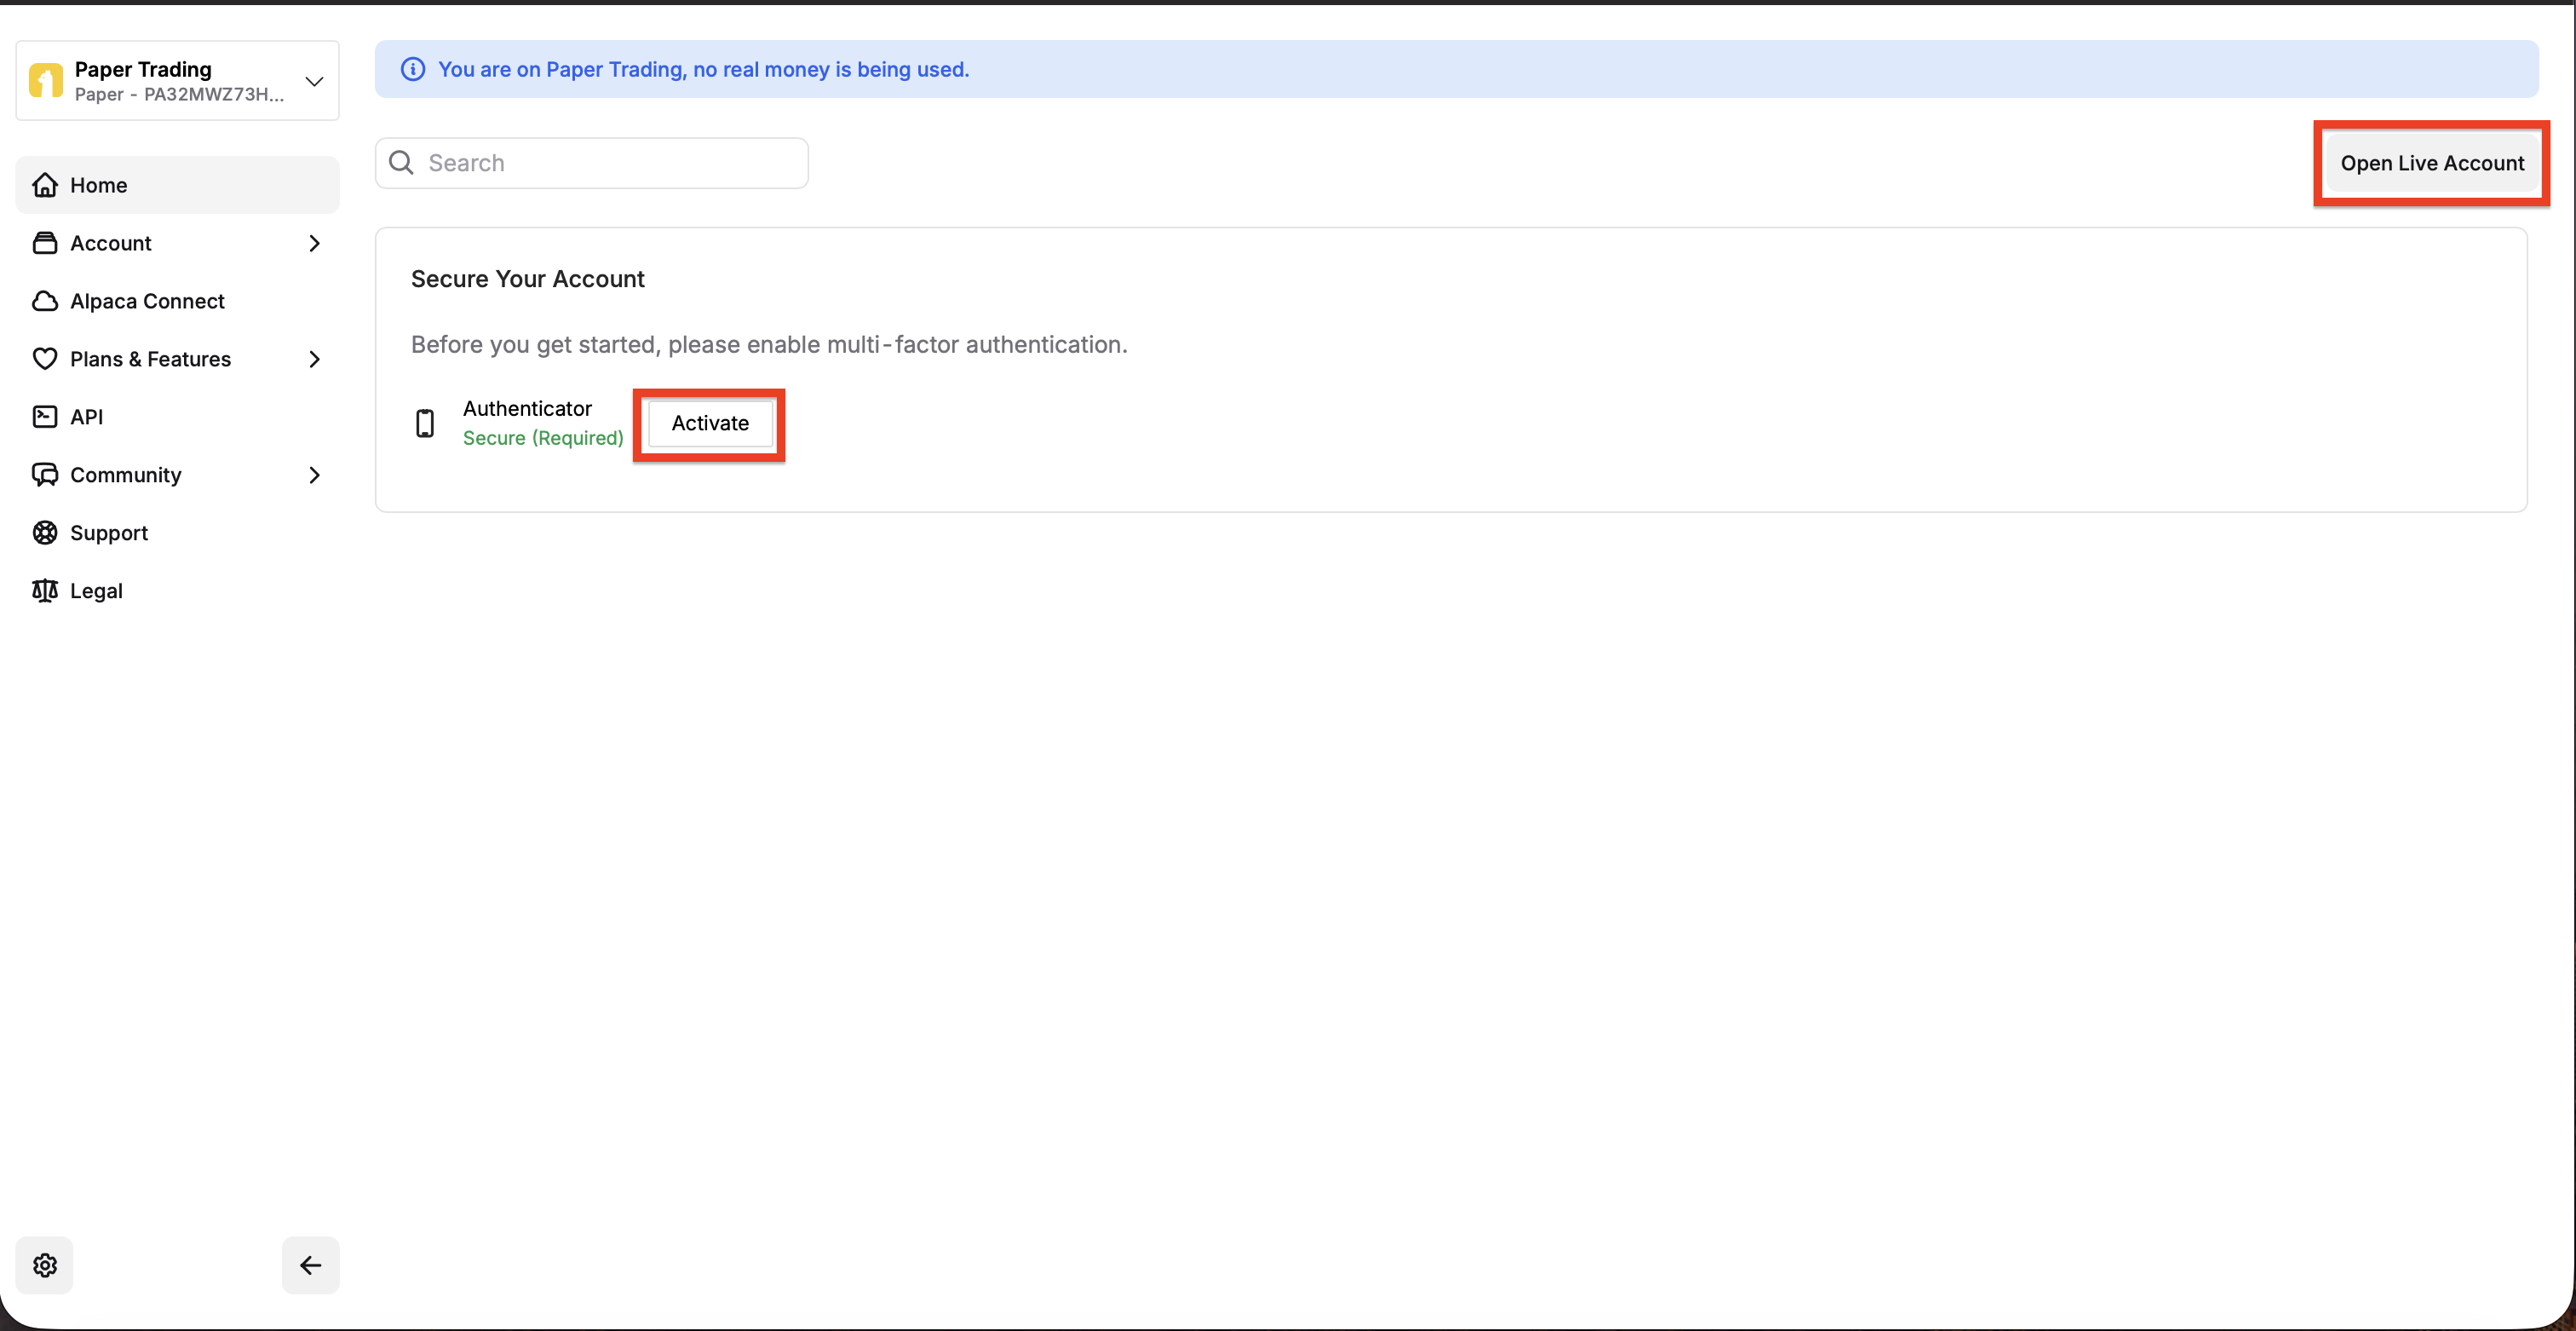
You'll start in Paper Trading mode. To switch to real money trading later, click "Open Live Account" in the top right. For both Paper and Live accounts, you'll need to set up 2-factor authentication by clicking "Activate".
Tip: We recommend starting with Paper Trading first. This lets you test everything with virtual money before using real funds. You can switch to live trading anytime.
Get Your Alpaca API Keys
API keys are like a special password that lets Aconsus connect to your Alpaca account safely. Our AI uses these keys to trade on your behalf.
Step 2.1: Log into your Alpaca account at app.alpaca.markets
Step 2.2: Click on "Home" in the left sidebar menu. In the screenshot below, this is marked with a red box labeled 1
Step 2.3: Look at the right side of the screen - you'll see the "API Keys" section. In the screenshot, this is marked with a red box labeled 2
Step 2.4: Here you'll find:
- Endpoint - The API address (this is shown automatically)
- Key - Your API Key ID (starts with "PK" for paper trading or "AK" for live trading)
Step 2.5: Click the "Regenerate" button to create a new Secret Key. In the screenshot, this is marked with a red box labeled 3
Step 2.6: Copy your API Key ID and Secret Key - you'll need both for the next step
Screenshot: Where to find your API Keys in Alpaca
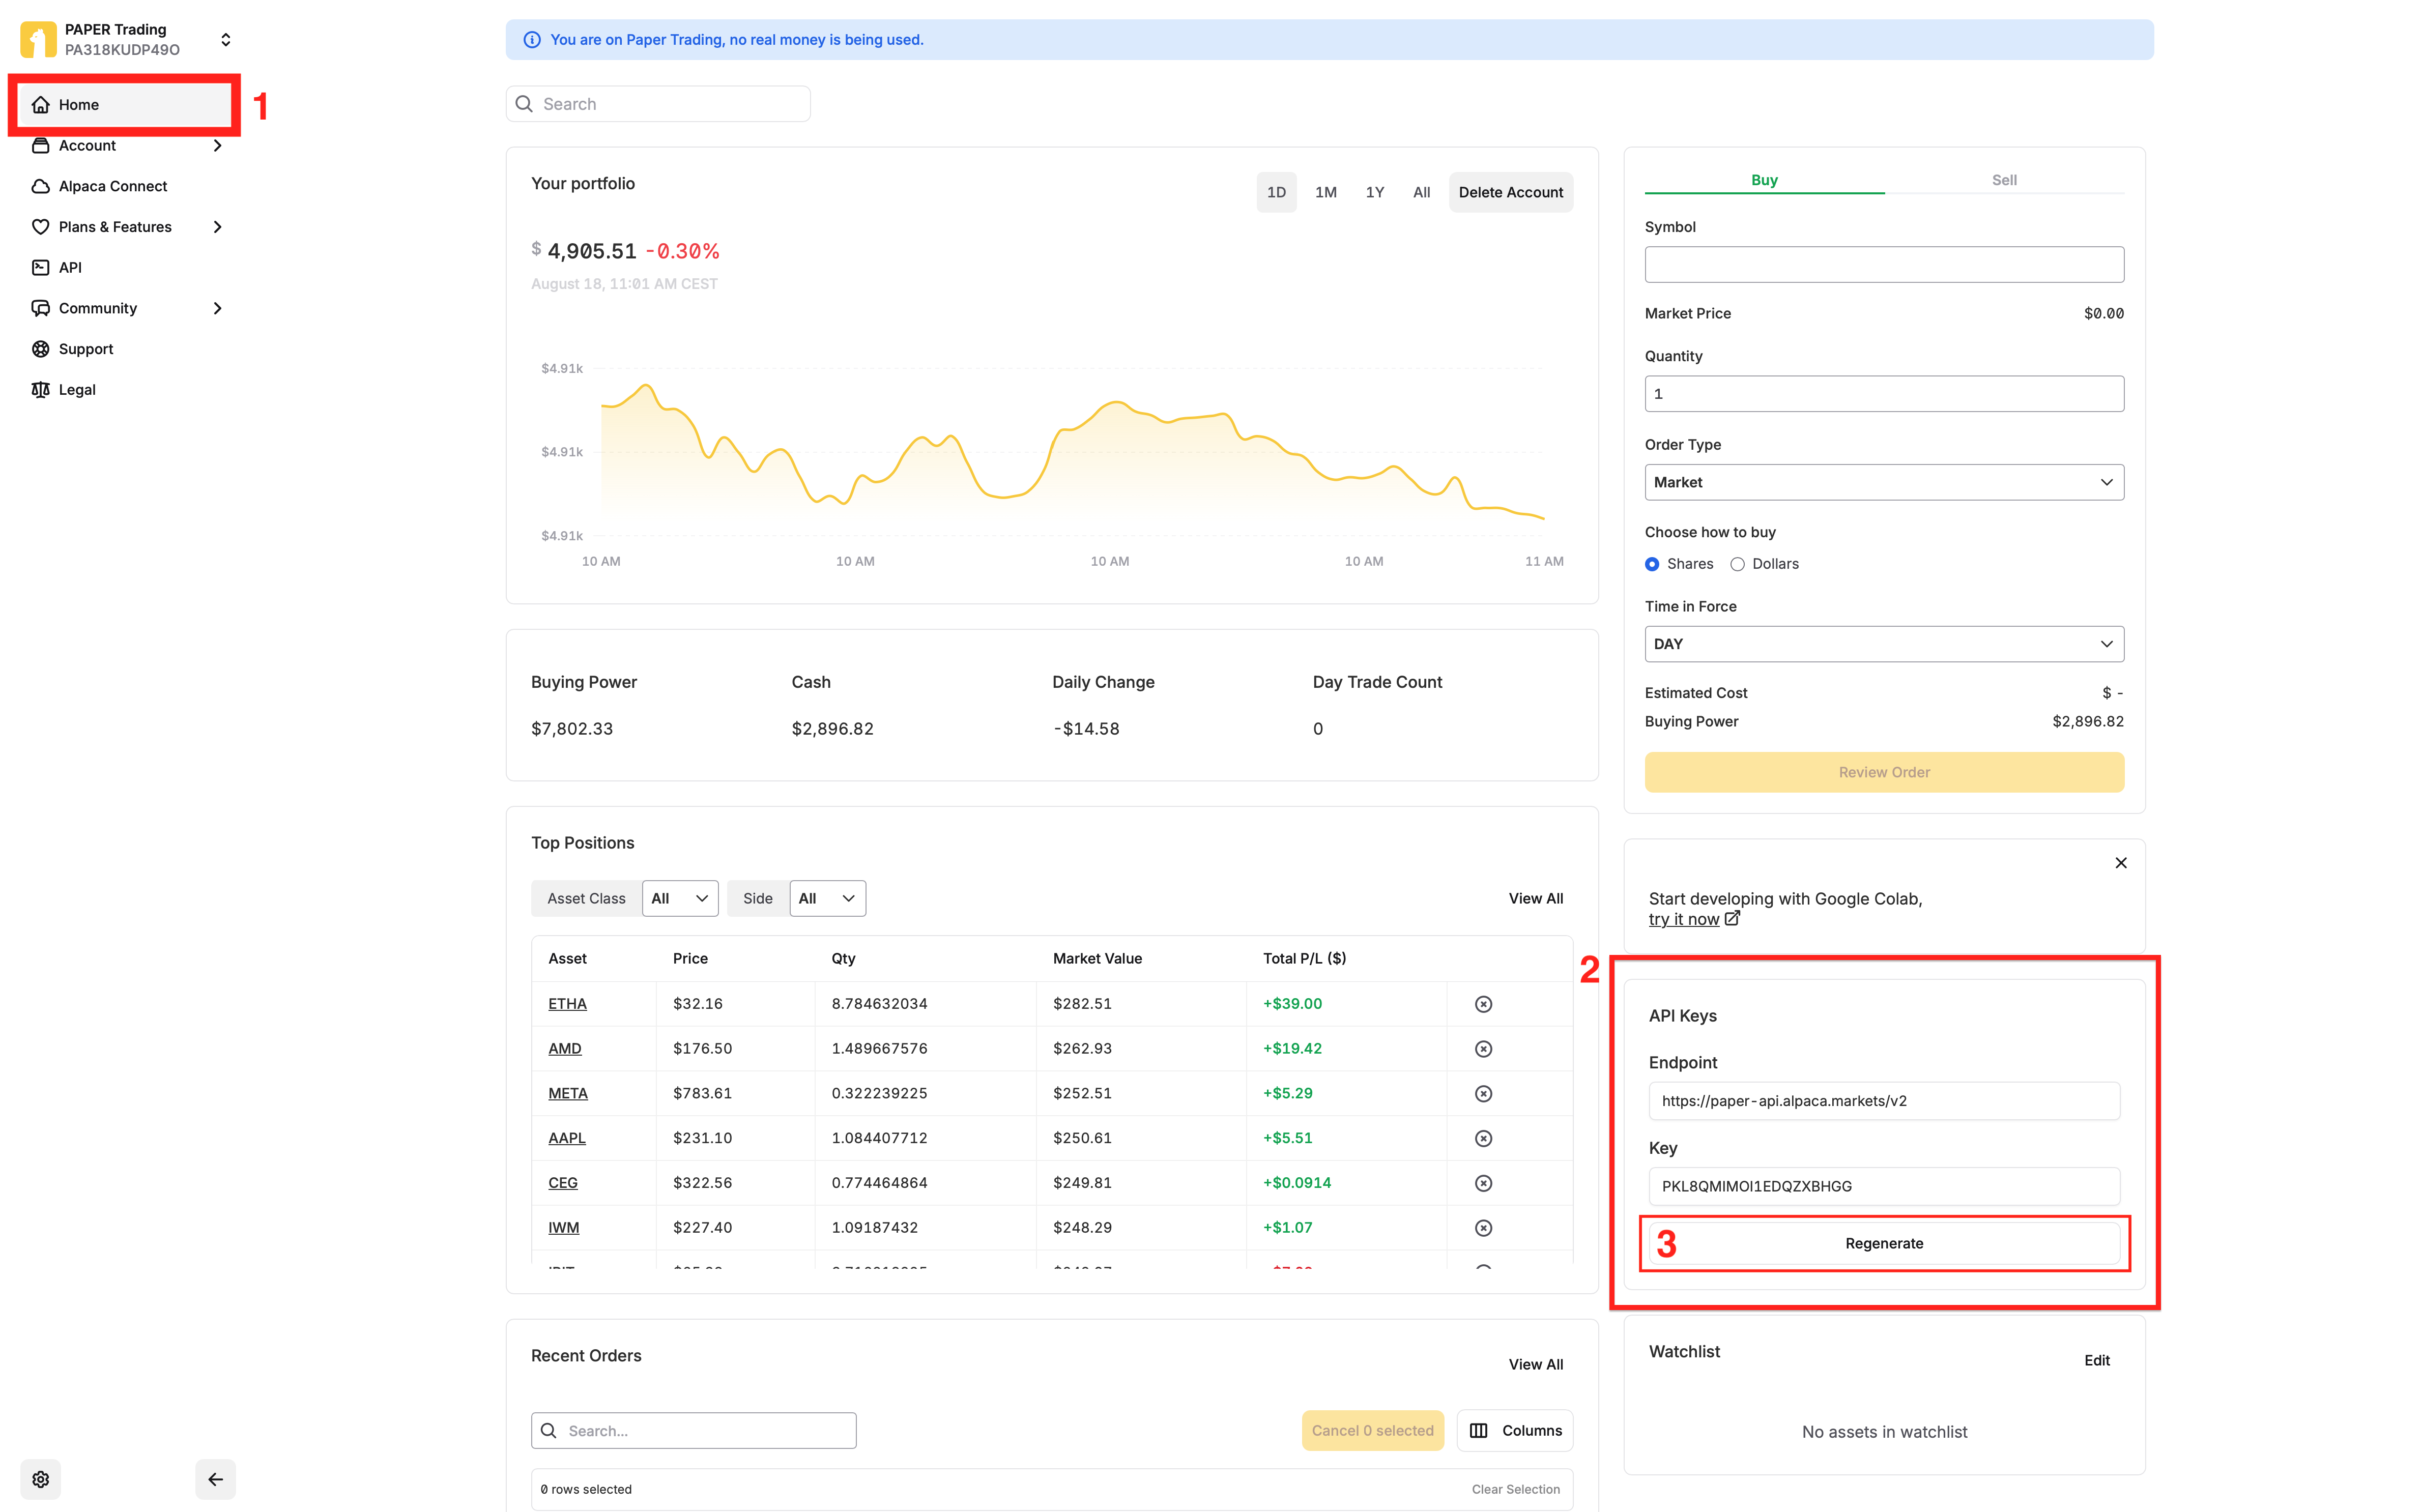
The red boxes show you exactly where to look: 1) Click Home, 2) Find the API Keys section, 3) Click Regenerate to get your Secret Key
How to tell which type of key you have:
- Keys starting with "PK" = Paper Trading (practice mode with virtual money)
- Keys starting with "AK" = Live Trading (real money)
Important: The Secret Key is only shown once when you regenerate it. Copy it immediately and save it somewhere safe. Never share your API keys with anyone - Aconsus stores them securely with encryption.
Connect Alpaca to Aconsus
Now you'll paste your API keys into Aconsus to connect your broker account. This is the final setup step!
Step 3.1: Go to your Aconsus Dashboard
Step 3.2: Click "Settings" in the top menu (or click the gear icon)
Step 3.3: Scroll down to the "Broker Configuration" section
Step 3.4: Click "Update my credentials" to edit your broker settings
Step 3.5: Select "Alpaca" as your broker (it will be highlighted in green when selected)
Step 3.6: Paste your keys in the two fields:
- Alpaca API Key ID - Paste your API Key (starts with "PK" or "AK")
- Alpaca Secret Key - Paste your Secret Key here
Step 3.7: Click "Update my credentials" to save - you should see a green "Broker connected" message
Screenshot: Where to enter your API keys in Aconsus
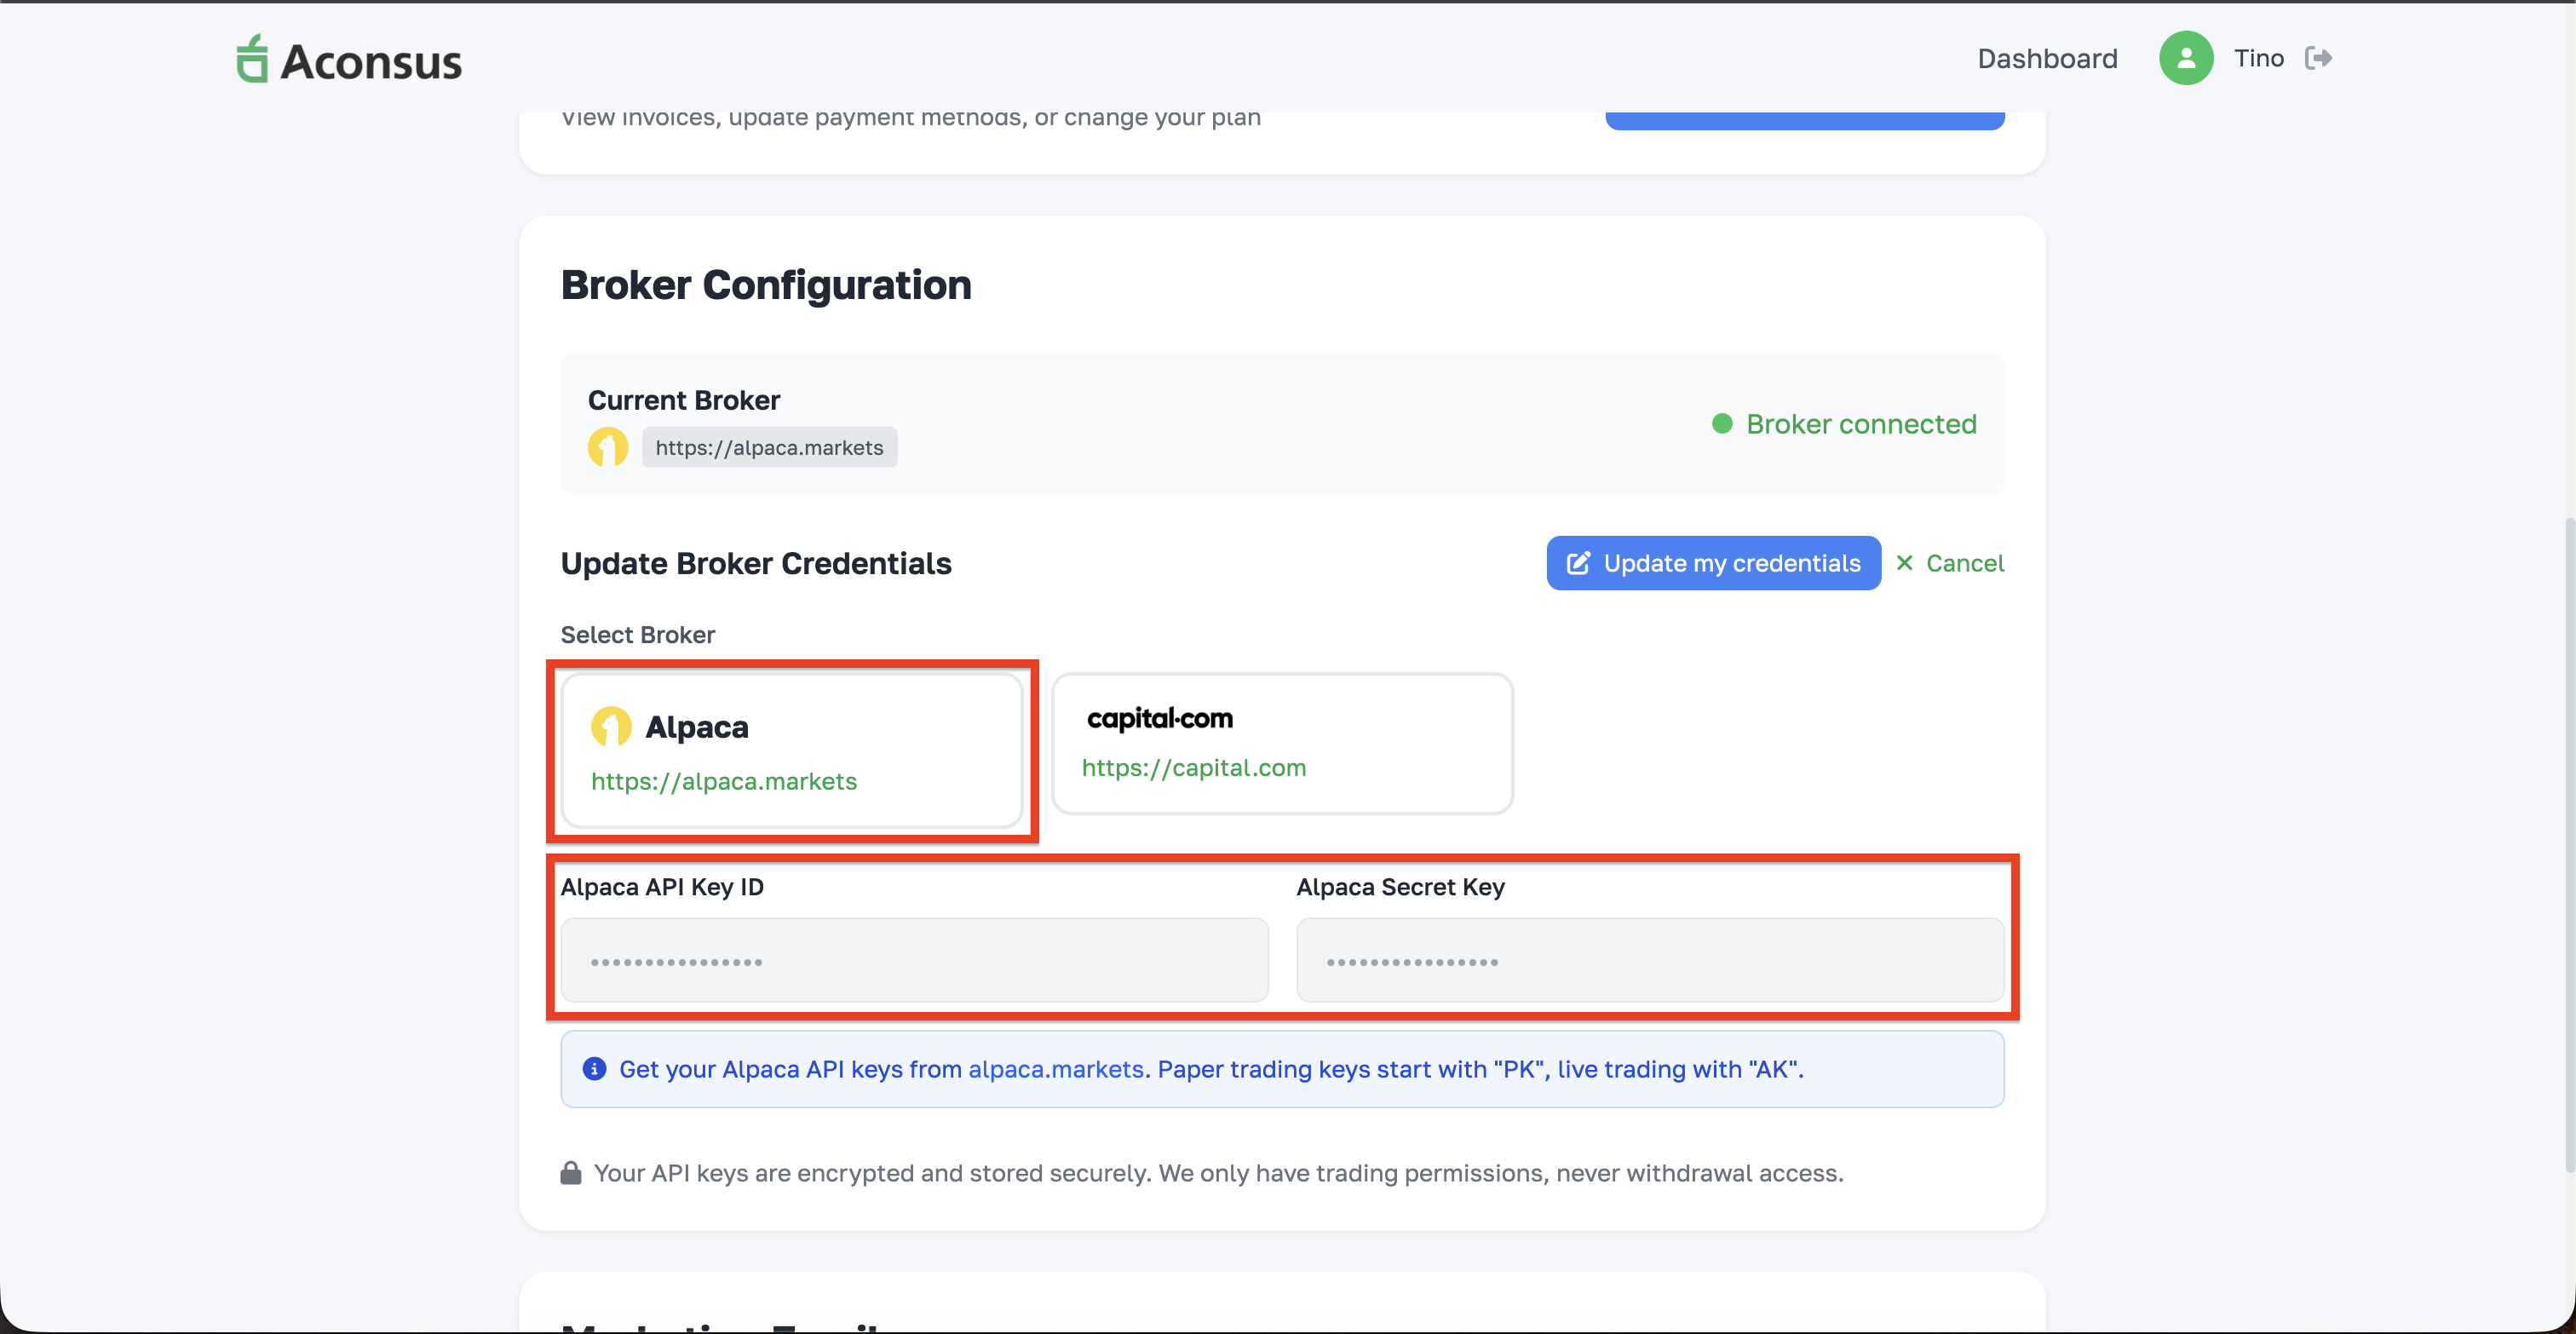
Select "Alpaca" as your broker (highlighted in green), then paste your API Key ID and Secret Key in the boxes below. When connected successfully, you'll see "Broker connected" at the top.
Note: Your API keys are encrypted and stored securely. Aconsus only has permission to execute trades - we can never withdraw or transfer funds from your account.
Start Your AI Trading Bot
You're almost done! Now activate your AI trading bot.
Step 4.1: Go back to your Dashboard
Step 4.2: Find the "Bot Status" card on your dashboard
Step 4.3: Click the green "Start Bot" button
Step 4.4: The status should change to "Running" - that's it, you're done!
Create Your Capital.com Account
Capital.com is a regulated CFD broker available in Europe and worldwide. Creating an account is free.
Step 1.1: Go to capital.com
Step 1.2: Click "Trade Now" or "Sign Up" and create your account
Step 1.3: Fill in all the necessary information and complete the verification process
Tip: Start with a Demo Account to practice risk-free before using real money.
Get Your Capital.com API Keys
API keys let Aconsus securely connect to your Capital.com account. Think of them like a password that allows our AI to trade for you.
Step 2.1: Log into your Capital.com account
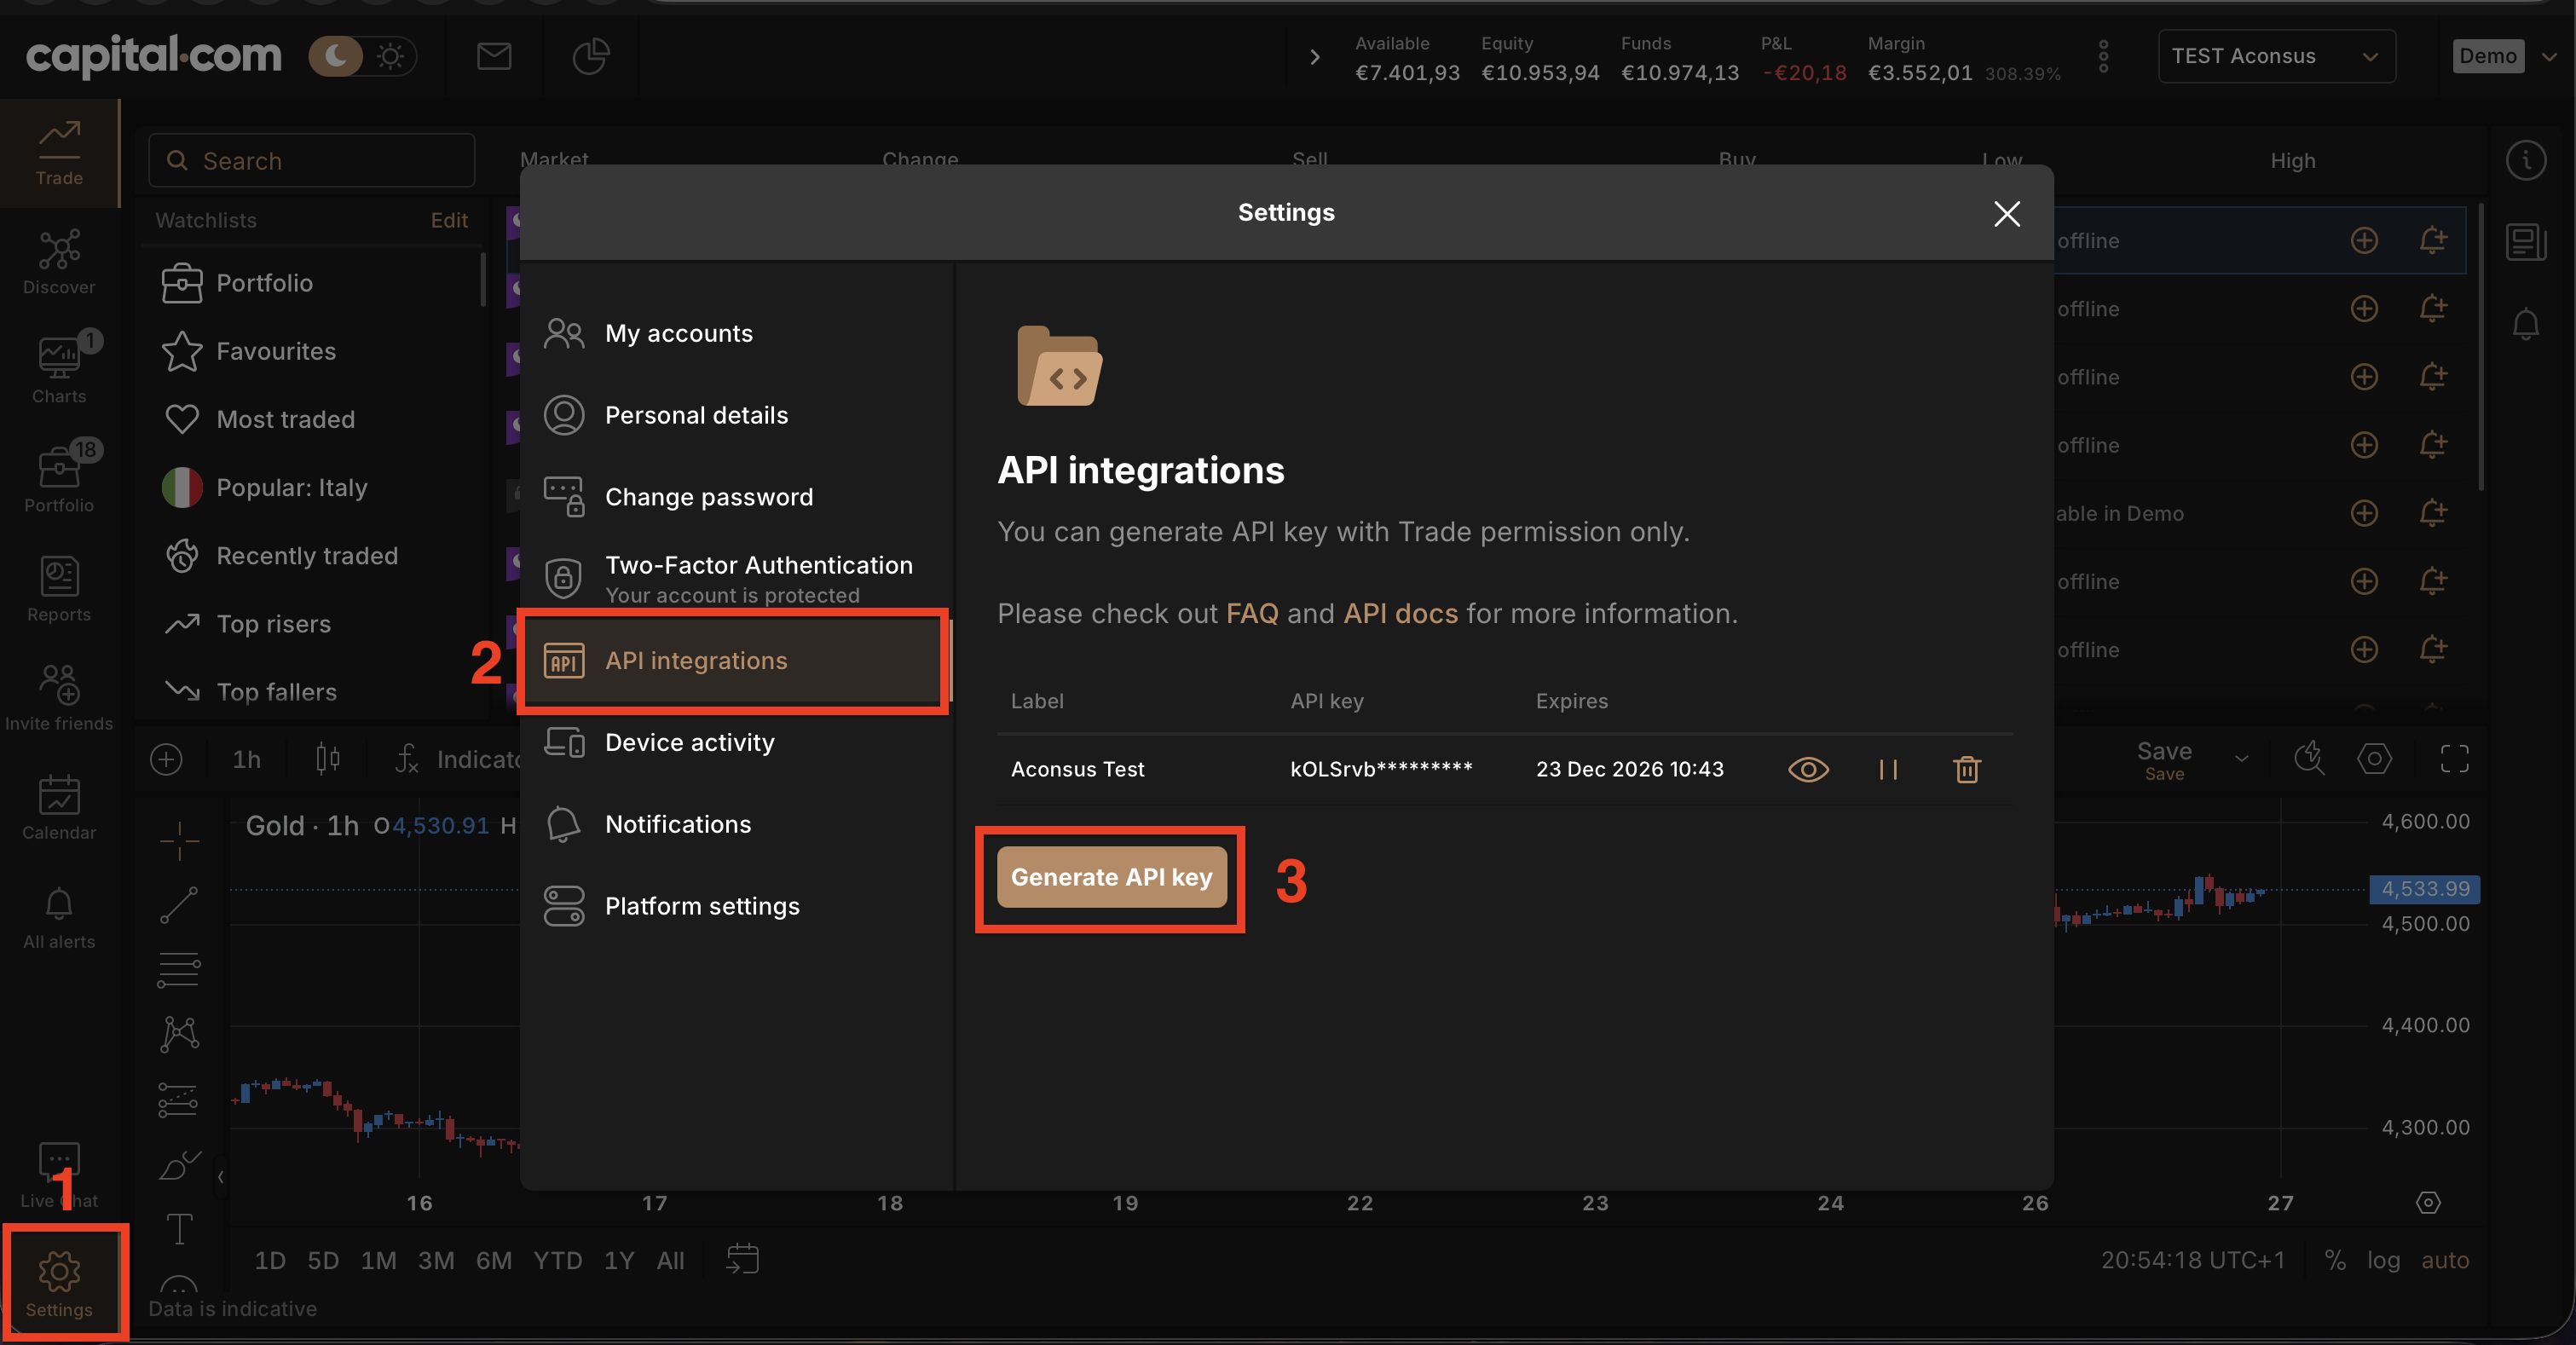
Step 2.2: Click "Settings" in the bottom-left corner (gear icon)
Step 2.3: Click "API integrations" in the menu
Step 2.4: Click "Generate API key"
Screenshot: Navigate to Settings > API integrations
Step 2.5: Enter a label (e.g., "Aconsus API") and create a custom password
Step 2.6: IMPORTANT: Click the X button next to the expiration date to remove it (this ensures your API key never expires)
Step 2.7: Click "Generate key" to create your API credentials
Step 2.8: Copy the API key and your custom password - you'll need both in the next step
Screenshot: Generate API key (remember to delete the expiration date!)
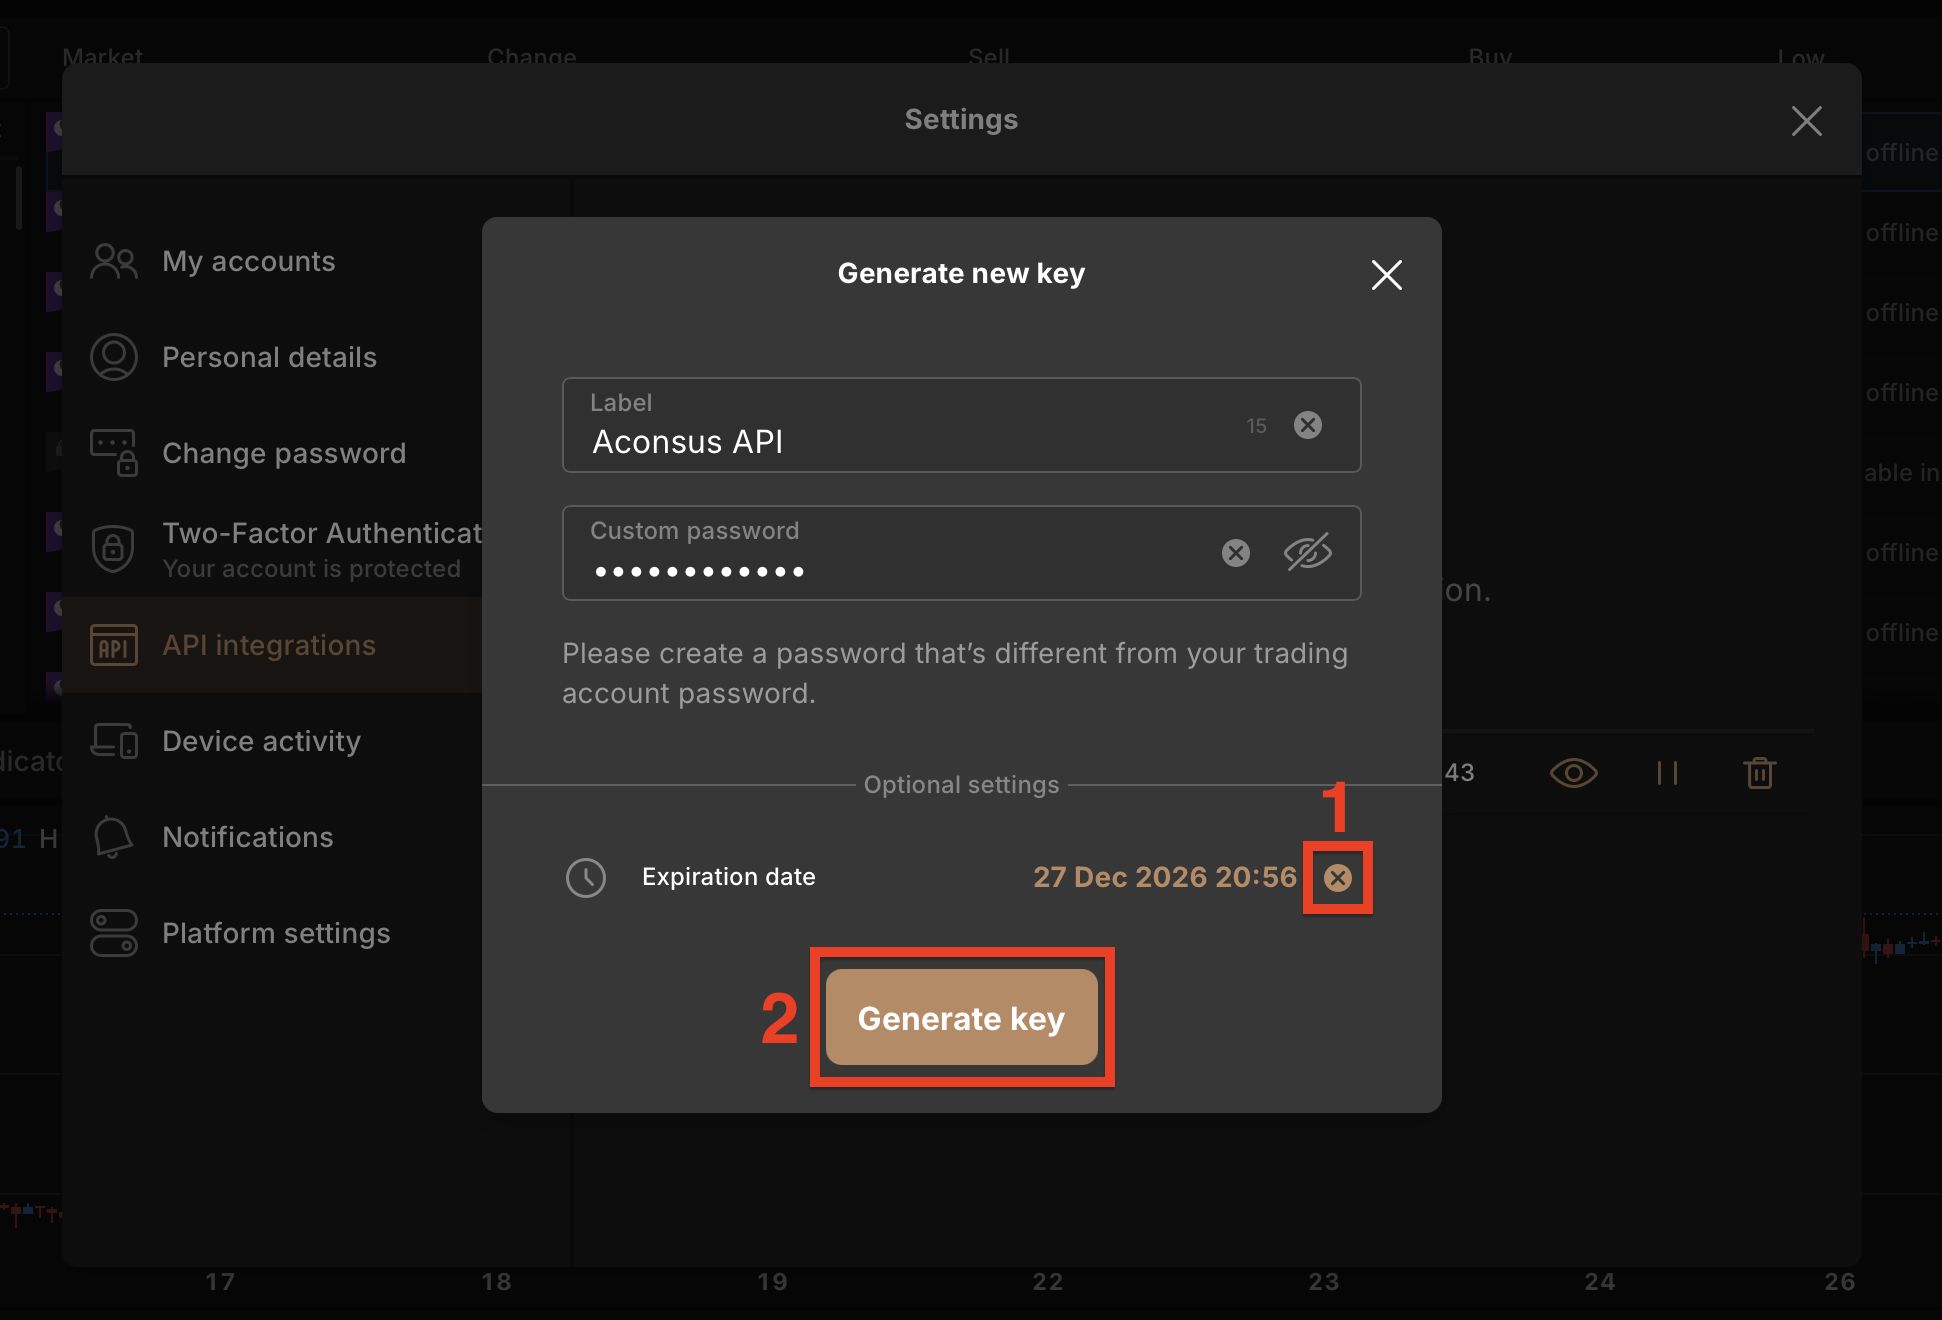
Remember: Delete the expiration date by clicking the X button (marked as 1 in the screenshot). This prevents your API key from expiring.
Important: Never share your API keys with anyone. Aconsus stores them securely with encryption.
Connect Capital.com to Aconsus
Now paste your API credentials into Aconsus to link your accounts.
Step 4.1: Go to your Aconsus Dashboard
Step 4.2: Click "Settings" in the top menu
Step 4.3: In the "Broker Configuration" section, select "capital-com" as your broker. This is marked as 1 in the screenshot below.
Step 4.4: Fill in your credentials. This is marked as 2 in the screenshot:
- Email/Identifier - Your Capital.com login email
- Password - The API password you created (not your login password)
- API Key - The API key you generated
Step 4.5: Select your Account Mode - Demo or Live. This is marked as 3 in the screenshot. Choose "Demo" to practice first.
Step 4.6: Click "Save Credentials" to connect your account
Screenshot: Where to enter your Capital.com credentials in Aconsus
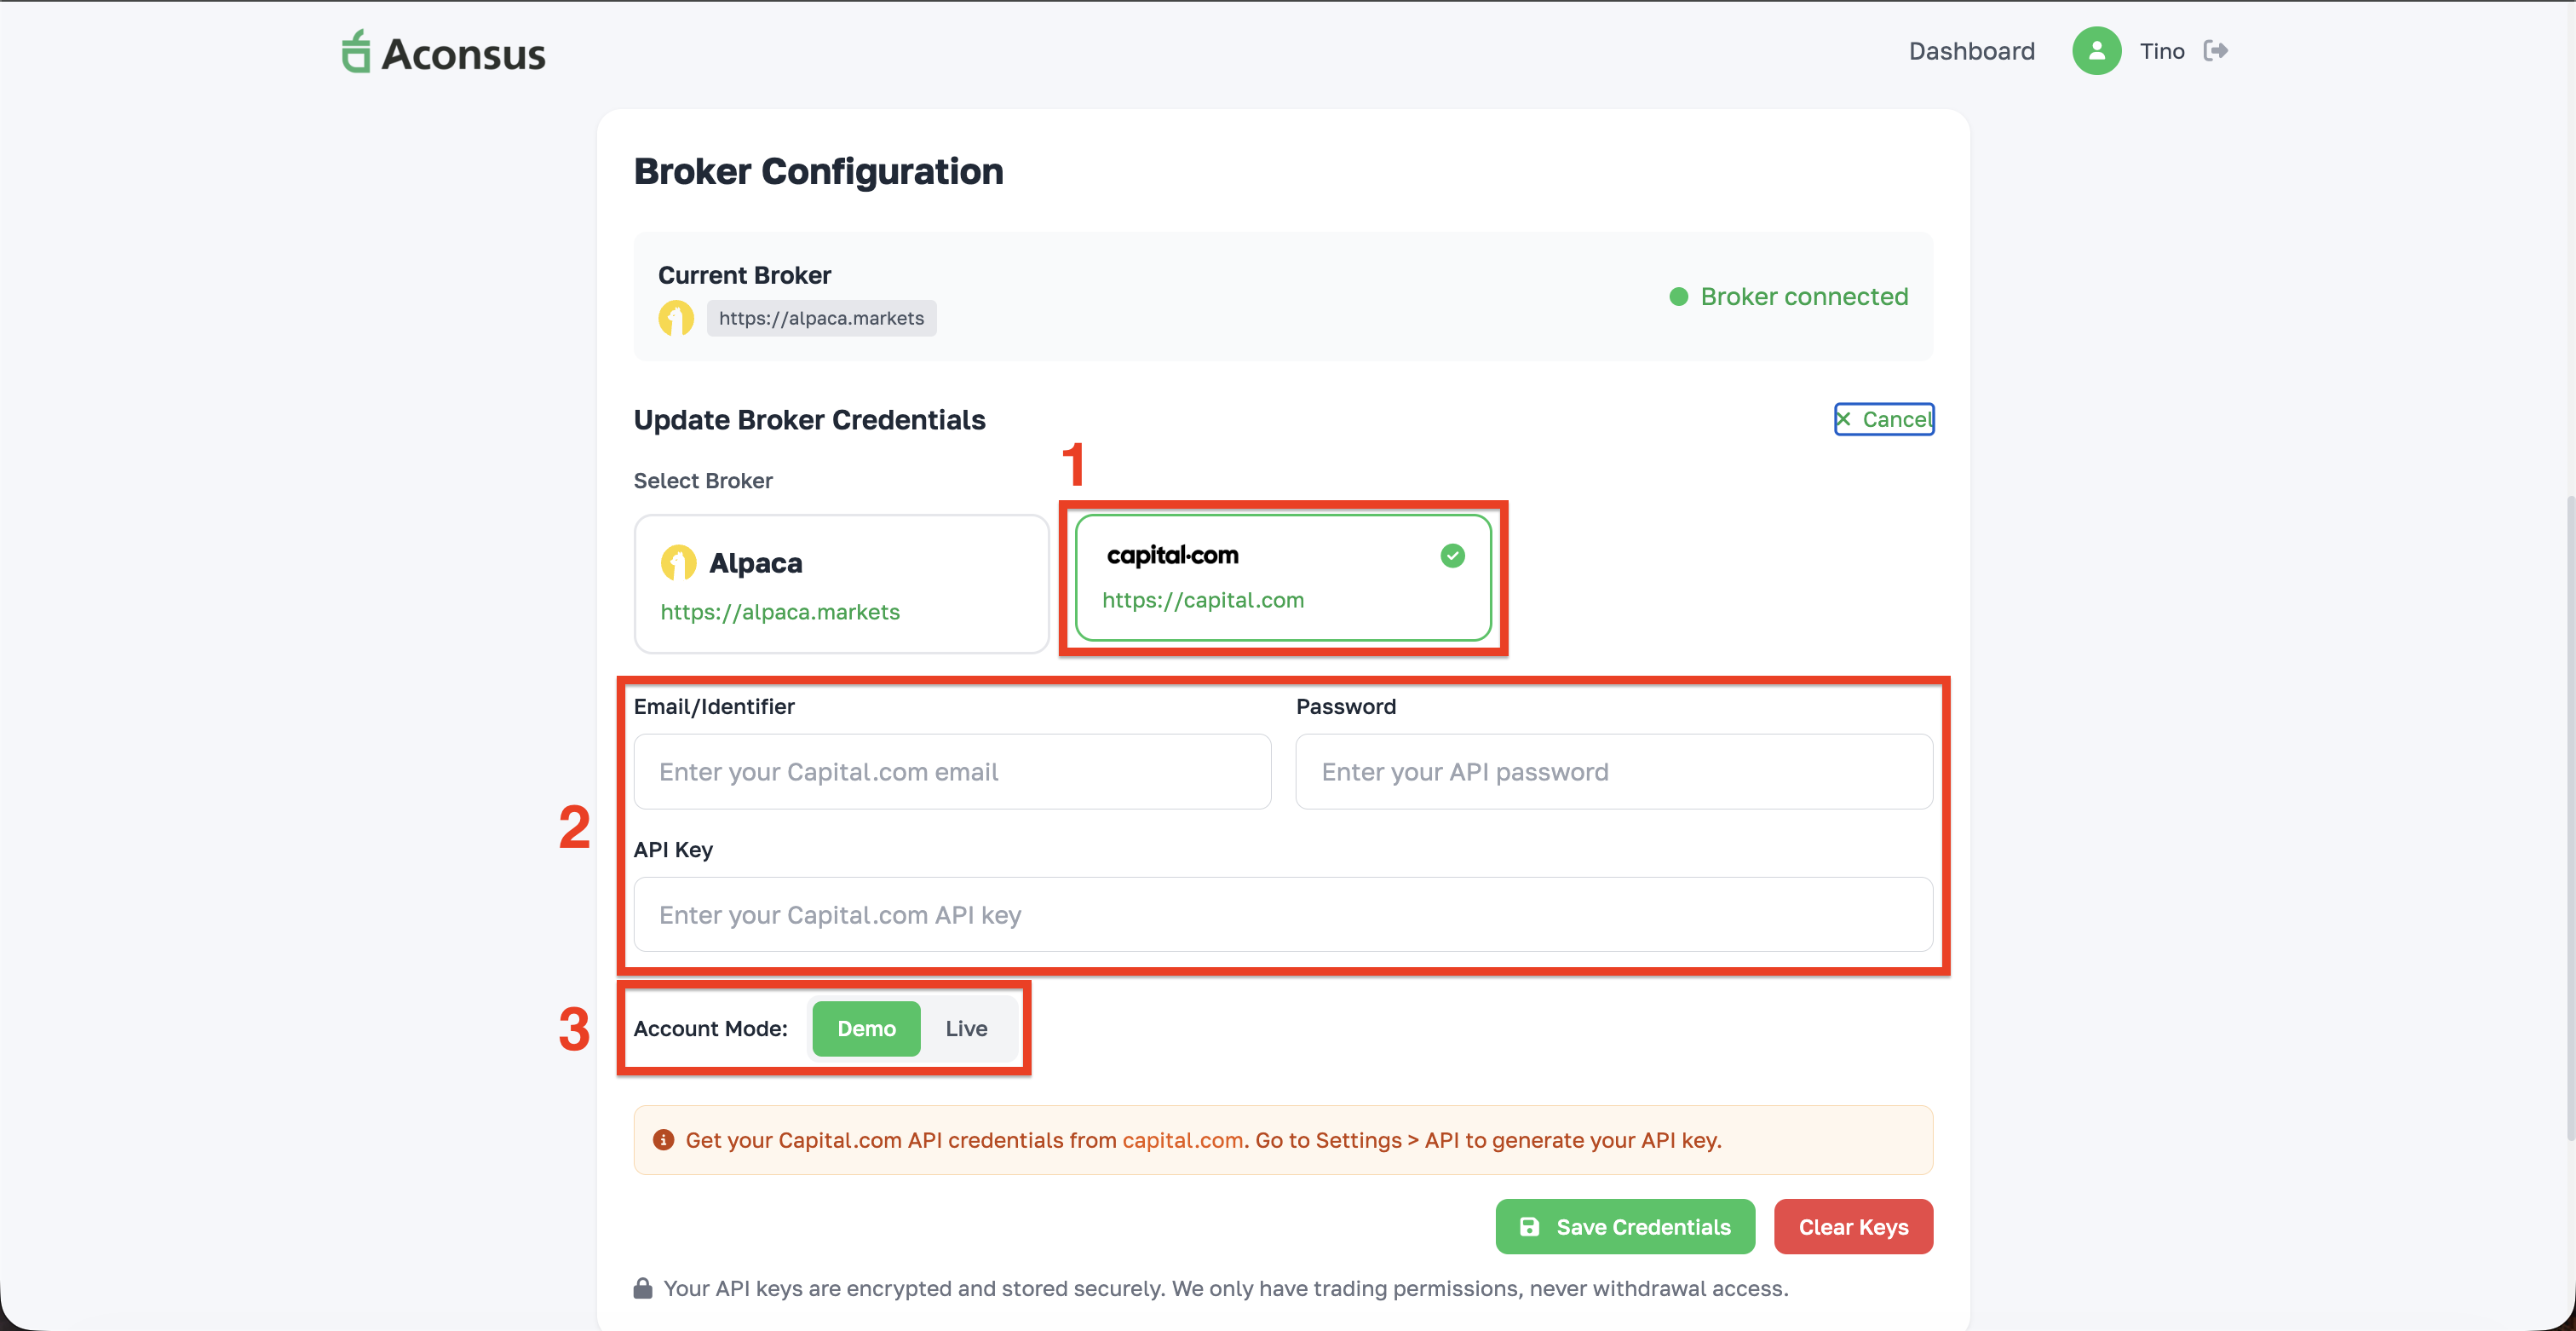
1) Select capital-com, 2) Enter your email, API password, and API key, 3) Choose Demo or Live mode, then click "Save Credentials".
Note: Your credentials are encrypted and stored securely. Aconsus only has permission to execute trades - we can never withdraw or transfer funds from your account.
Start Your AI Trading Bot
You're almost done! Now activate your AI trading bot.
Step 5.1: Go back to your Dashboard
Step 5.2: Find the "Bot Status" card on your dashboard
Step 5.3: Click the green "Start Bot" button
Step 5.4: The status should change to "Running" - that's it, you're done!
Configure Your Leverage Settings
Important: Set Leverage to 1:1
We strongly recommend setting your leverage to 1:1 for Shares. Higher leverage means higher risk - you could lose more money than you invested.
With 1:1 leverage, you only trade with the money you actually have. This is the safest option for most users.
Before connecting to Aconsus, you need to configure your leverage settings in Capital.com. This is a very important step!
Step 3.1: In Capital.com, click on the Settings icon (gear icon) in the bottom-left corner
Step 3.2: Click on "My accounts" in the left menu
Step 3.3: Find the account you want to use (Demo or Live) and click on the leverage settings icon (looks like sliders)
Screenshot: How to access leverage settings
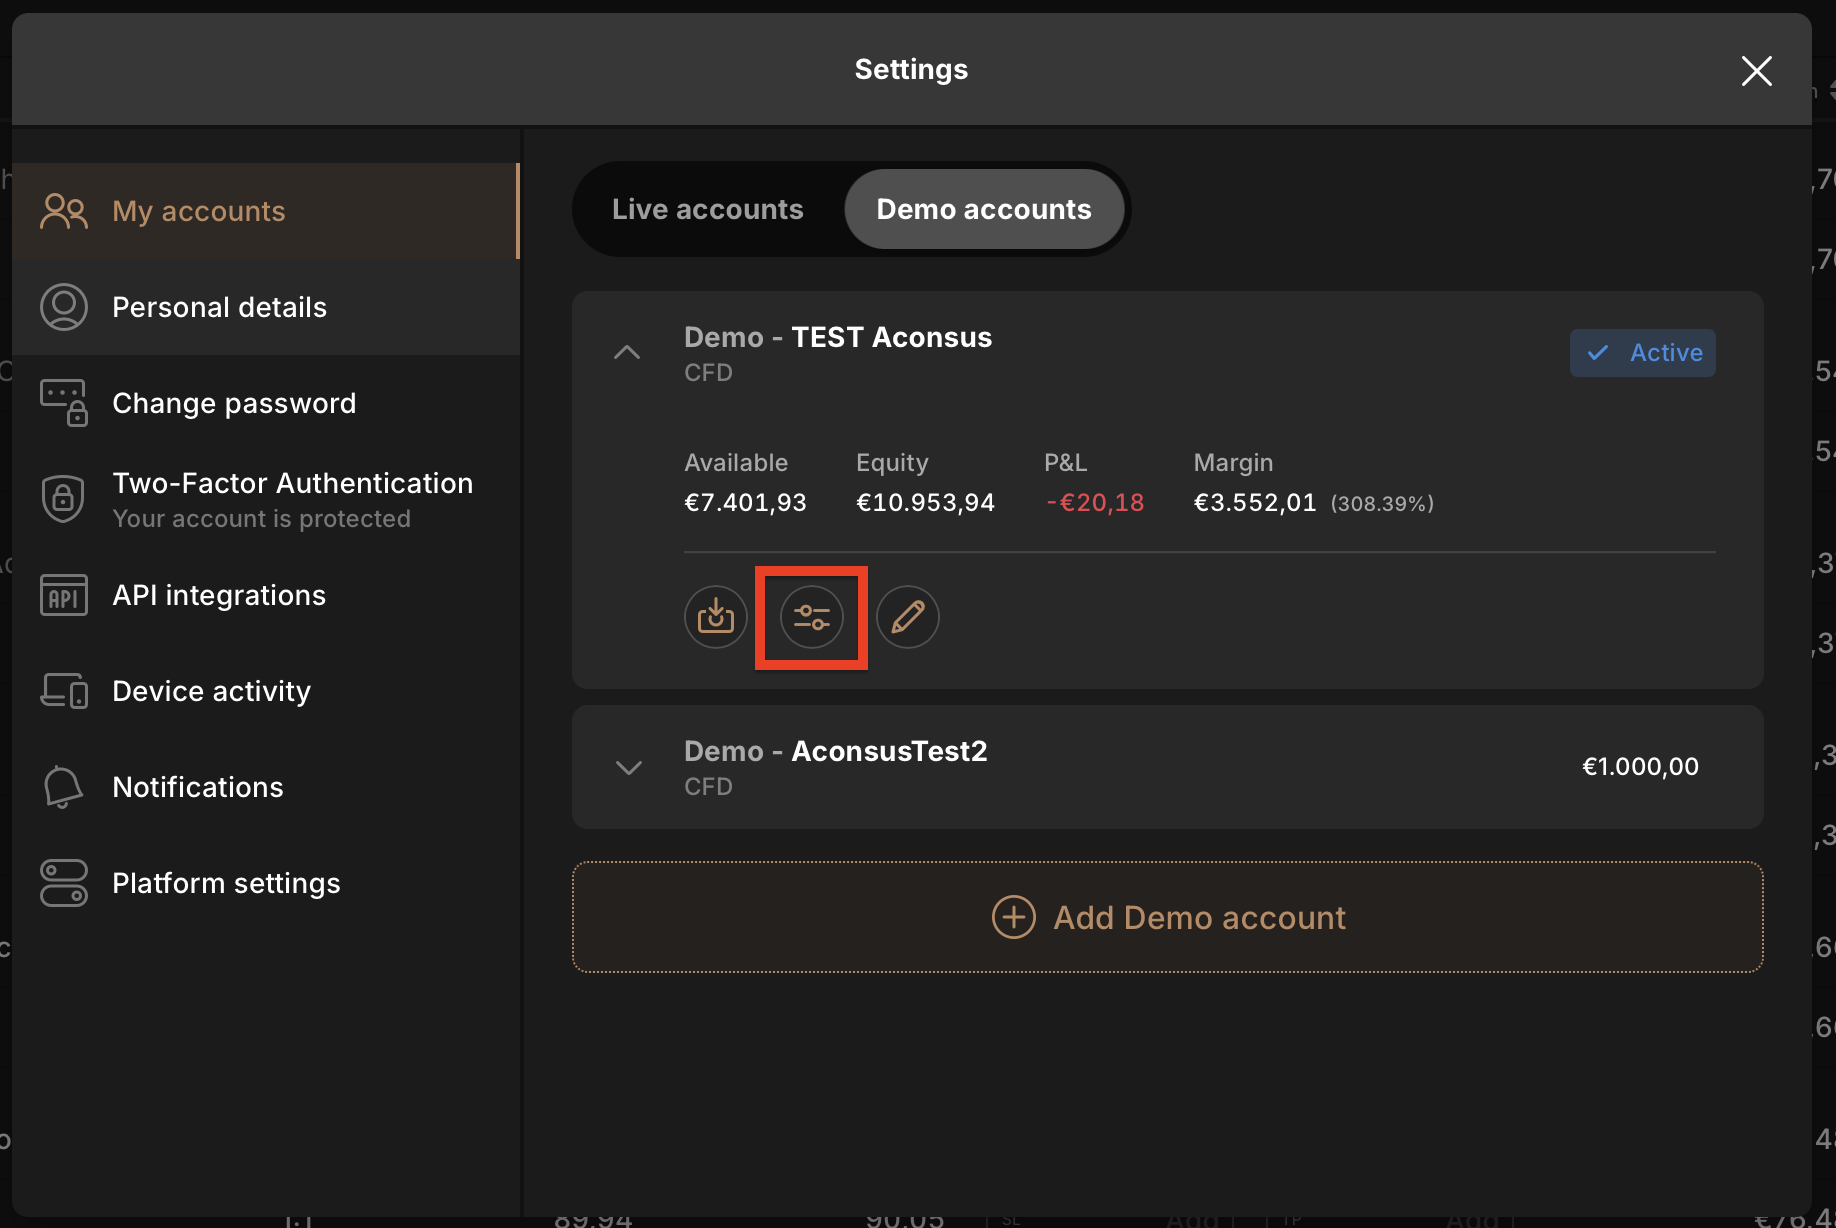
Click the settings/sliders icon (highlighted in red) next to your account to open leverage options.
Step 3.4: In the Leverage settings, find "Shares" and change it to 1:1
Step 3.5: Save your settings
Screenshot: Set Shares leverage to 1:1
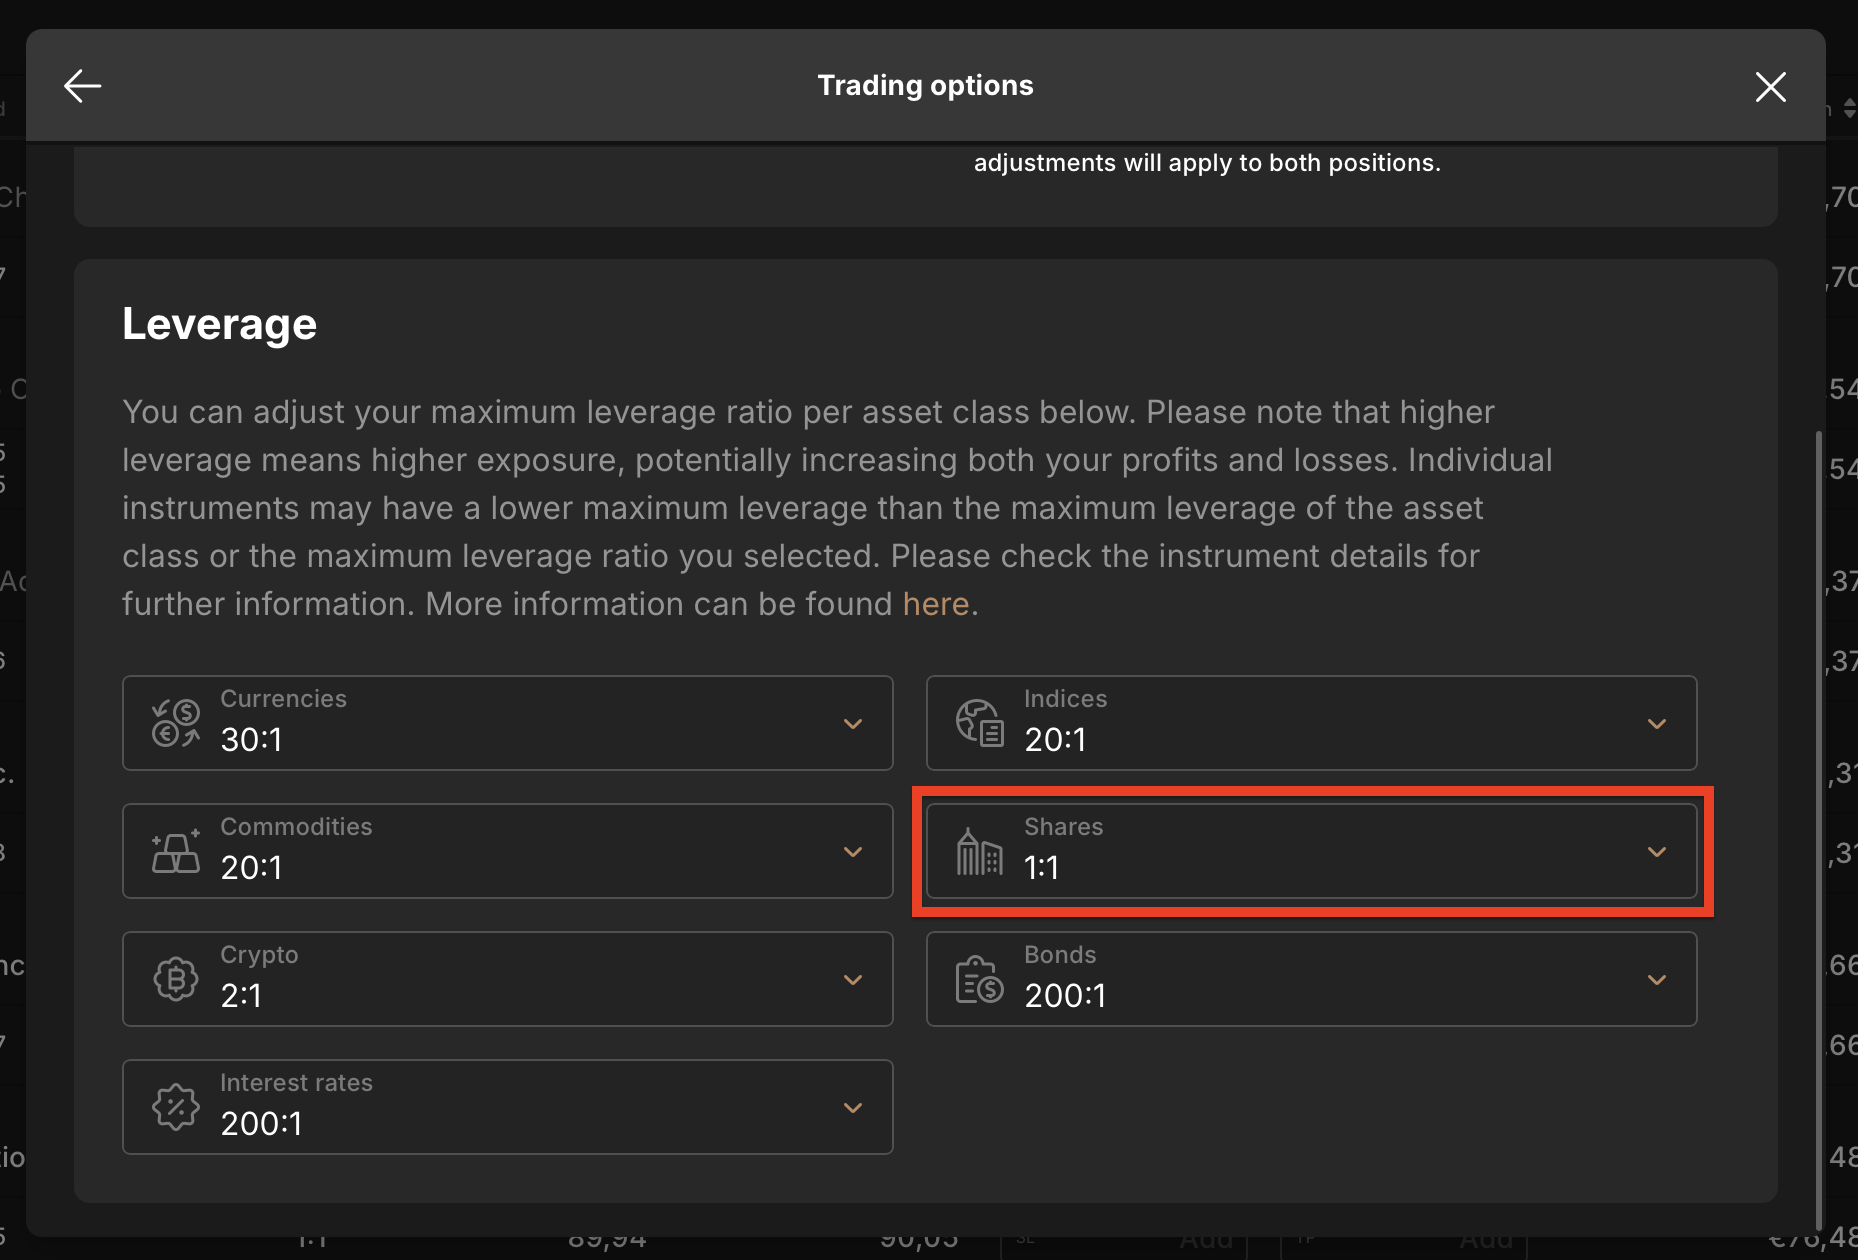
Make sure "Shares" is set to 1:1 (highlighted in red). This is the safest setting for trading.
What is leverage? Leverage lets you trade with more money than you have. For example, 5:1 leverage means you can trade $500 with only $100. While this can increase profits, it also increases losses. We recommend 1:1 to protect your money.
What Happens Next?
AI Monitors Markets
Our AI watches the markets 24/7, looking for the best trading opportunities.
Automatic Trading
When conditions are right, the bot automatically executes trades in your account.
Track Your Progress
Check your dashboard anytime to see your portfolio performance and trade history.
Need Help?
Stuck on a step? Our support team is happy to help you get started.
Ready to Begin?
Follow the steps above, and your AI trading bot will be running in minutes.
Go to Dashboard